Yang Xiao Long (Rwby)
Yang Xiao Long is one of the protagonists of RWBY. RWBY (pronounced ruby) is an American multimedia franchise produced by Rooster Teeth Productions. Costume built in 2021.


Part 1: Ember Celica (Gauntlets)
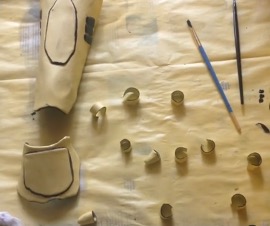
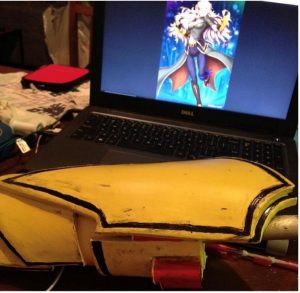
The first piece of the outfit that was made was the armor. I made the armor when I first started cosplaying. The Gauntlet itself is made of EVA foam and PVC pipe to make the muzzle. The Robot Arm is made from craft foam and Worbla. While painting the pieces I decided to use a dry painting technique to make the scuff marks
When I first made Ember Celica (the name of the gauntlets), it had craft foam buckshot shells. But after many occasions of crushing the shells, I collected used ones and glued them on.
Part 2: The Jacket
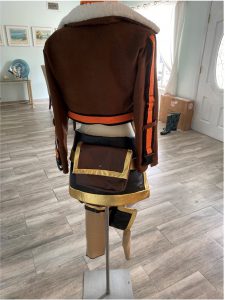
The bomber jacket is made with suede brown fabric. The sleeve belts are fully functional, and the sleeves can be rolled up and clipped to the elbow. The belts are 2 belts glued together with E600. I took measurements of the sleeves and attached the belts before sewing the jacket together.
Once the sleeve customization was done, I went on to the rest of the jacket. I like putting zippers on jackets first so I know if I need to add more to the sides or take it in before attaching the collar and sleeves. Once I was satisfied with the fit, I removed the zipper, and cropped the jacket, added the Sherpa collar, and sleeves.


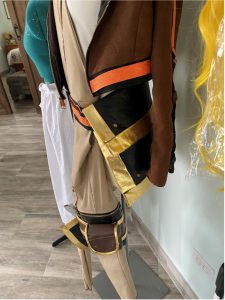
Part 3: Overalls
Next thing to do was Overalls. I started by creating just normal overalls with a front zipper, then measured where the middle of my thigh was and cut the legs off and resewed them together with a separating zipper.
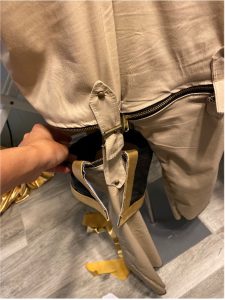
Next part was the details. I added studs and belt buckles to the separating zippers and studs on the shoulder straps. Yang has flaps on one of her separating pant legs as well as a belt flap with an ammo case and back pouch. I made these out of black and brown pleather, and the gold trim is foam covered with gold spandex and glued on with E600. Once the gold had dried on the foam it was time to apply it to the pleather. I had to glue the pieces onto the costume as I didn’t want any seams to show


Next up was the belt flaps, and ammo pouches. I sewed to brown pleather to make the pouches and used a strip of velcro to secure the flaps. The belt flaps Yang wears its 2 pieces of pleather sewn together and then gold trim placed all around it. There is a back pouch on it as well that doubles as a purse.
Part 4: Belt Buckle
I would be lying if I said this wasn’t the hardest part of the project. The overalls were detailed but this was the first time working with metal forging. It was first made with foam but looked terrible. So, then it was 3d printed. That’s when the idea of making it out of metal came into play. First try was with sand casting and aluminum. It didn’t work well. Taking the 3d print, it was then made into a plaster cast. Then molten brass was poured into the plaster cast. After breaking off the plaster and cleaning the cast buckle, the brass was polished with a bench grinder and an angle grinder.


Part 5: The Yellow Hair
Yangs hair is a bright sunny yellow. So I ordered a Luthian Arda Wig in Yellow and long wefts. She has a LOT of hair in the show. Once the wig arrived, I got to work adding more volume by sewing the wefts in.
It has a lot of hair
Once the wefts were in I had to curl the hair. Steam is my friend!
Then it was on to styling her bangs. Yang’s bangs are pretty simple and remind me of Princess Peach. I feathered the side bangs and pulled them back, pinned them into place and applied hairspray. The front bang was the same but this time I teased the root to give it more volume and then applied hairspray. Next was the ahoge. I took hair from the top and trimmed it to a short amount, then backcombed it to oblivion. Once the nest on the crown of the head was made, I started brushing it out to sculpt the ahoge. Then hairsprayed everything.


